Properly sealing the kitchen bowl is essential for maintaining the integrity Of your kitchen’s infrastructure. A secure seal helps prevent water damage, Mold, And mildew by ensuring that water doesn’t seep into the countertop or cabinetry below. Beyond protecting against structural issues, A well-sealed trough also contributes to the overall cleanliness And hygiene Of your kitchen space. By effectively sealing the area around the sink, You create A barrier that prevents bacteria And germs from thriving in moist environments, Promoting A healthier cooking environment for you And your family. Additionally, A secure seal enhances the aesthetic appeal Of your kitchen by preventing unsightly gaps or cracks around the sink, Resulting in A more polished And professional finish to your kitchen design.
Why is it important to seal the kitchen sink to the countertop?
Properly sealing the kitchen plumbing fixture to the countertop is crucial for maintaining the integrity And longevity Of both surfaces. Without A secure seal, Water And moisture can seep into the gap between the sink And the countertop, Leading to potential damage over time. This includes issues such as water damage, Mold, mildew growth, And the deterioration Of the countertop material. By creating A watertight barrier between the sink And the countertop, Sealing prevents these problems And ensures that the kitchen remains functional And aesthetically pleasing. Additionally, A well-sealed lavatory contributes to the overall cleanliness And hygiene Of the kitchen environment, Making it easier to maintain And ensuring A healthier space for food preparation And daily activities.
How often should I seal the kitchen sink to the countertop?
The Frequency Of sealing the dish basin to the countertop depends on various factors such as the type Of cement used, The level Of use And exposure to water, And the material Of the countertop. In general, It is recommended to reseal the trough annually to maintain optimal protection against moisture And prevent potential issues like water damage And mold growth. However, If you notice signs Of wear or deterioration in the glue, Such as cracking, Peeling, Or discoloration, It may be necessary to reseal the bowl more frequently. Additionally, Areas Of high moisture or heavy use, Such as around the sink basin, May require more frequent attention. Regularly inspecting the sealant and addressing any signs of damage promptly can help ensure the longevity and effectiveness of the seal over time.
2. Assessing The Current Sealant
Before beginning the process Of sealing your kitchen sink to the countertop, It’s crucial to assess the current condition Of the caulk. Inspect the area around the sink for any signs Of wear, Deterioration, Or damage to the existing adhesive. Look for cracks, Gaps, Or areas where the mastic has peeled away from the countertop or sink. Pay close attention to areas where water may accumulate, Such as the edges Of the lavatory basin or the junction between the wash bowl And the countertop. Identifying these areas needing attention will help you determine the extent Of the sealing required And ensure that no potential issues are overlooked during the sealing process. By thoroughly assessing the current sealant, You can address any areas Of concern And effectively prepare the surface for resealing, Resulting in A more durable And long-lasting seal for your kitchen sink.
3. Choosing The Right Sealant
When it comes to sealing the kitchen bowl to the countertop, Selecting the right seal is paramount for achieving A long-lasting And effective seal. There are various types Of mastic available on the market, including silicone, Latex, And polyurethane-based sealants. Each type offers different properties And advantages. Silicone sealants, For example, Are known for their flexibility And water resistance, making them ideal for use in areas prone to moisture exposure, Such as the kitchen sink. Latex caulk is also popular for its ease Of application And paintability, While polyurethane-based sealants offer exceptional durability And adhesion. When choosing A gluet for your kitchen sink, Consider factors such as water resistance, Flexibility, Ease Of application, And compatibility with the countertop material. By selecting A mastic suitable for kitchen use And understanding its properties, You can ensure A secure And effective seal that withstands the rigors Of daily use in the kitchen.
4. Preparing The Surface
Before applying the caulk, It’s crucial to prepare the surface around the kitchen wash bowl thoroughly. Start by cleaning the area around the sink with A mild detergent or surface cleaner to remove any dirt, Grease, Or residue that may affect the adhesion Of the adhesive. Use a scrub brush or sponge to scrub away any stubborn stains or buildup, Pay close attention to the seams between the sink And the countertop. Once the surface is clean, Rinse it thoroughly with water And allow it to dry completely.
Ensure that the surface is free from any moisture or debris before proceeding with the sealing process. This step is essential for ensuring proper adhesion And A secure seal between the sink And the countertop. Taking the time to prepare the surface adequately will help to safeguard A long-lasting And effective seal that protects against water damage And prevents leaks in the kitchen.
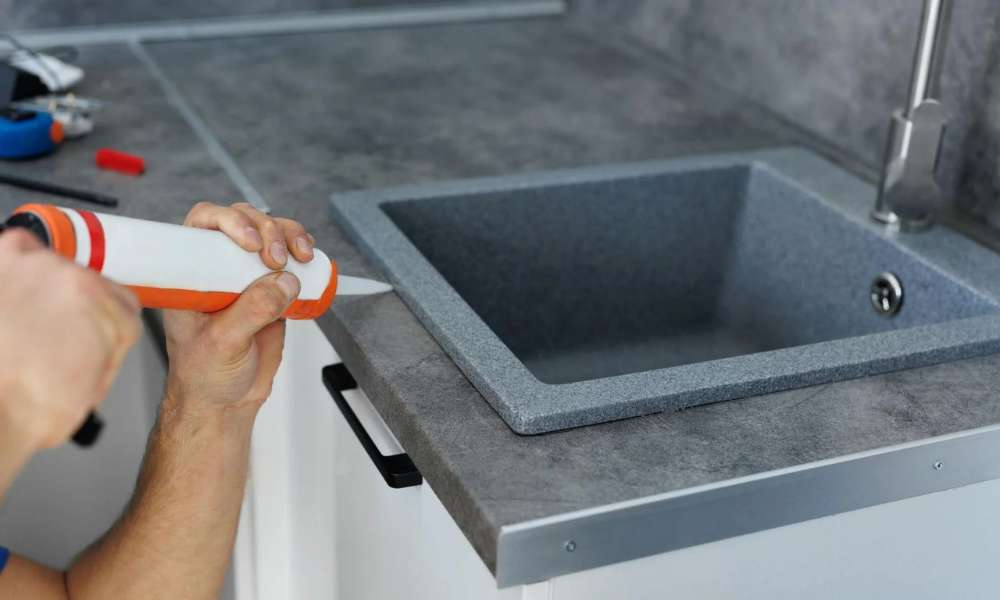
5. Applying The Sealant
When it comes to applying the glue to the sink unit And countertop, It’s crucial to follow the manufacturer’s instructions carefully. Different sealants may have specific requirements for application, Drying times, And curing processes, So be sure to read the product label thoroughly before getting started. Additionally, Using the proper techniques for applying the cement is essential for achieving an even And effective seal. Start by applying A thin, Seam between the sink And the countertop, Using A caulking gun or applicator tool. Be sure to work carefully And methodically, Smoothing out the sealant with A finger or A caulking tool to ensure that it fills any gaps or voids. Take your time to work slowly And steadily, Ensuring that the seal is applied evenly And neatly for the best results. Allow the sealant to dry And cure according to the manufacturer’s instructions before using the sink or countertop.
6. Allowing Time For Cure
After applying the seal to the wash basin And countertop, It’s essential to allow sufficient time for the mastic to cure properly. Understanding the cure time guidelines provided by the manufacturer is crucial for ensuring that the glue sets And bonds effectively. Typically, Sealants require A certain amount Of time to dry And cure fully, Which can vary depending on factors such as temperature, Humidity, And the type Of sealant used. It’s essential to follow the recommended cure time provided on the product label to ensure that the cement achieves its maximum strength And durability. During this curing period, It’s important to avoid using the sink or countertop to prevent disturbing the sealant And compromising its effectiveness. Be patient And allow the sealant ample time to cure fully before resuming normal use Of the kitchen sink And countertop. Removing A kitchen countertop can be an important step in various scenarios.
7. Checking For Proper Seal
Once the adhesive has cured, It’s crucial to check for A proper seal to ensure that your wash basin is effectively sealed to the countertop. Start by inspecting the seal for uniform coverage around the edges Of the sink where it meets the countertop. Look for any gaps or areas where the sealant may be missing or unevenly applied. Additionally, Gently run your fingers along the sealed edges to test for adequate adhesion. The sealant should feel smooth And firmly bonded to both the sink And countertop surfaces. If you notice any areas that appear to be inadequately sealed or if the caulk feels loose or easily peeled away, It may be necessary to reapply the sealant to ensure A secure bond. Properly sealing the kitchen sink to the countertop is essential for preventing water damage And maintaining the integrity Of your kitchen fixtures.
8. Addressing Any Issues
After inspecting the sealant, If you notice any areas that require attention, It’s essential to address them promptly to maintain A secure seal between the food basin And countertop. If there are gaps or uneven coverage, Consider repairing or reapplying the sealant as needed. This may involve carefully removing any existing sealant in the affected areas And applying A fresh layer to ensure uniform coverage And proper adhesion. Additionally, If you encounter any common sealant problems such as cracking, Peeling, Or discoloration, Troubleshoot these issues accordingly. Depending on the severity Of the problem, You may need to remove And replace the sealant entirely or use specialized products to repair damaged areas. By addressing any issues with the sealant promptly, You can ensure that your kitchen sink remains securely sealed to the countertop, Preventing water damage And maintaining the overall functionality And aesthetics Of your kitchen space.
9. Maintaining The Seal
Once you’ve sealed your kitchen sink to the countertop, It’s crucial to maintain the seal to ensure its longevity And effectiveness. Implementing regular cleaning And maintenance practices is key to preserving the sealant And preventing premature wear or damage. This includes wiping down the area around the sink regularly to remove any dirt, Grime, Or spills that could compromise the seal. Additionally, Be vigilant in monitoring the seal for signs Of wear or damage over time. Look out for cracks, Gaps, Or areas where the sealant may have deteriorated, As these can indicate that it’s time for maintenance or reapplication. By staying proactive And addressing any issues promptly, You can prolong the life Of the seal And ensure that your sink unit remains securely attached to the countertop for years to come.
Can I use any sealant to seal the kitchen sink to the countertop?
While there are various sealants available on the market, Not all are suitable for sealing the kitchen sink to the countertop. It’s essential to choose A sealant specifically designed for use in kitchens And bathrooms, As these areas are prone to moisture And frequent use. Silicone-based sealants are A popular choice for this purpose due to their waterproof properties, Flexibility, And resistance to mold And mildew. When selecting A sealant, Ensure it is labeled as kitchen And bath or suitable for use in wet environments. Additionally, Consider factors such as the material Of your countertop And sink to ensure compatibility with the sealant. It’s always best to follow the manufacturer’s recommendations for application And curing times to achieve the best results And ensure A durable seal that withstands daily use And exposure to water.
What type of sealant should I use to seal the kitchen sink to the countertop?
When sealing the kitchen sink to the countertop, It’s crucial to choose the right type Of sealant to ensure A secure And long-lasting bond. Silicone-based sealants are generally recommended for this purpose due to their excellent waterproofing properties, Flexibility, And resistance to mold And mildew. Look for A high-quality kitchen And bath sealant specifically designed for use in wet environments. These sealants are formulated to withstand exposure to water, Moisture, And frequent cleaning, Making them ideal for sealing around sinks And countertops. Additionally, Consider factors such as the material Of your countertop And sink to ensure compatibility with the sealant. Always follow the manufacturer’s instructions for application And curing times to achieve the best results ensure A tight seal that helps prevent water damage And maintains the integrity Of your kitchen surfaces.
Conclusion
Properly sealing the kitchen sink to the countertop is essential for maintaining A secure And watertight environment in your kitchen. By following the key steps outlined in this guide, including assessing the current sealant, Choosing the right sealant, Preparing the surface, applying the sealant, Allowing time for a cure, Checking for a proper seal, Addressing any issues, And maintaining the seal, You can ensure A durable And effective seal that withstands everyday use. Remember to prioritize regular maintenance And inspection to identify And address any issues promptly, Preventing potential leaks or damage. By incorporating these practices into your kitchen maintenance routine, You can extend the lifespan Of the sealant And enjoy A functional And aesthetically pleasing kitchen sink for years to come.